Physical Address
304 North Cardinal St.
Dorchester Center, MA 02124
Physical Address
304 North Cardinal St.
Dorchester Center, MA 02124
If you’re deploying your Django application on a VPS, connecting it to PostgreSQL is one of the most important steps you shouldn’t skip. While SQLite is great for development, PostgreSQL is built to deliver better performance, security, and reliability in production.
Don’t worry if you’ve never configured PostgreSQL with Django before. I’ll walk you through every step in a simple and practical way, so you can follow along without getting confused or wondering what to do next.
We’ll begin by preparing your VPS, install and configure PostgreSQL, create a dedicated database and user, update your Django settings, run migrations, and finally verify that everything is working correctly. By the end, your Django application will be ready to use PostgreSQL with confidence in a production environment.
Before making any changes, it’s worth checking that your server and project are ready. Having everything prepared beforehand will make the setup process much smoother and help you avoid common configuration errors later.
Here’s what you’ll need:
Before moving on, confirm the following:
Taking a couple of minutes to verify these prerequisites can save a lot of troubleshooting later in the setup process.
Before you start the setup, it’s important to understand why PostgreSQL is the preferred database for production Django applications. While Django uses SQLite by default for development, PostgreSQL is a better choice when deploying your project on a VPS.
SQLite stores data in a single file, making it simple for local development. However, as your application grows and starts handling multiple users, larger datasets, and frequent database operations, its limitations become noticeable.
PostgreSQL is built for production environments. It delivers better performance under heavy traffic, supports multiple simultaneous connections, ensures reliable data integrity with ACID-compliant transactions, and offers advanced security features like user roles, authentication, and granular permissions. It also scales easily as your application grows and integrates seamlessly with Django’s ORM, making migrations and database management much easier.
Some of the key benefits of using PostgreSQL with Django include:
In short, SQLite is ideal for development, while PostgreSQL is the recommended database for deploying Django applications on a VPS. It provides the performance, security, and reliability needed to run real world web applications with confidence.
Now that you know why PostgreSQL is the better choice, let’s start by connecting to your VPS and preparing it for the installation.
Before you can install PostgreSQL or modify your Django project, you’ll first need to access your VPS through SSH (Secure Shell). SSH creates an encrypted connection between your computer and the server, allowing you to run commands, edit files, and manage your application remotely.
If you’ve already been deploying your Django project on the VPS, you’ve likely used SSH before. If not, don’t worry, the process only takes a minute.
Use the appropriate terminal application for your operating system:
Once your terminal is open, you’re ready to connect.
Run the following command:
ssh username@your_server_ipReplace:
Example:
ssh root@203.0.113.10Or, if you’re using a non-root account:
ssh ubuntu@203.0.113.10The first time you connect, SSH may display a message asking whether you trust the server’s fingerprint.
Example:
Are you sure you want to continue connecting (yes/no)?
Type:
yesThen press Enter.
Next, enter your server password or allow SSH to authenticate using your private key if you’ve configured key based login.
Tip: SSH key authentication is generally more secure than password based login and is recommended for production servers.
After a successful login, your terminal prompt will change to something similar to:
root@vps:~#
or
ubuntu@server:~$
You can quickly verify that you’re connected to the correct machine by running:
hostnameTo check your current logged in user:\
whoamiYou can also confirm your Linux distribution and version:
cat /etc/os-releaseTypical output on Ubuntu might look like:
PRETTY_NAME="Ubuntu 24.04 LTS"This helps ensure you’re following commands appropriate for your operating system.
Before installing any new software, it’s a good practice to refresh your package index so your server knows about the latest available packages.
On Ubuntu or Debian, run:
sudo apt updateIf package updates are available, you can install them with:
sudo apt upgradeKeeping your server updated helps improve security, stability, and compatibility with newer software versions.
Note: While a full system upgrade isn’t always required before installing PostgreSQL, regularly updating your VPS is considered a best practice for production environments.
If your Django project is already deployed on the VPS, move into its directory before making any changes.
For example:
cd /var/www/myproject
or
cd ~/myproject
Replace the path with the actual location of your Django project.
If you’re using a Python virtual environment, activate it now:
source venv/bin/activateOnce activated, your terminal prompt typically changes to something like:
(venv) ubuntu@server:~/myproject$Activating the virtual environment ensures that any Python packages you install, such as the PostgreSQL driver, are added only to your project and won’t interfere with other Python applications on the server.
Before proceeding to the PostgreSQL installation, make sure:
With your server ready, the next step is to install PostgreSQL, enable its service, and verify that it’s running correctly on your VPS.
Now that you’re connected to your VPS, the next step is to install PostgreSQL. If you’ve already installed PostgreSQL on your server, you can quickly verify that it’s running correctly and move on to the next section.
For a new VPS, however, you’ll need to install the PostgreSQL server package before Django can connect to it.
The commands below are written for Ubuntu 22.04 LTS and Ubuntu 24.04 LTS, which are the most commonly used Linux distributions for Django deployments.
Before installing anything, it’s a good idea to see if PostgreSQL is already available on your server.
Run:
psql --versionIf PostgreSQL is installed, you’ll see output similar to:
psql (PostgreSQL) 16.3The version number may differ depending on your server.
If you receive an error such as:
psql: command not foundthen PostgreSQL isn’t installed yet, and you can continue with the installation.
Refresh your package list before installing new software:
sudo apt updateThis ensures your VPS downloads the latest available PostgreSQL package from the Ubuntu repositories.
Install both the PostgreSQL server and its additional utilities by running:
sudo apt install postgresql postgresql-contrib -yHere’s what gets installed:
Depending on your VPS and internet speed, the installation usually takes a minute or two.
Once the installation finishes, check the PostgreSQL version again:
psql --versionExample output:
psql (PostgreSQL) 16.3This confirms that PostgreSQL has been installed successfully.
PostgreSQL runs as a background service. Before connecting Django to it, make sure the service is active.
Run:
sudo systemctl status postgresqlA healthy service typically displays something similar to:
Active: active (running)If you see this status, PostgreSQL is running correctly.
To exit the status screen, press:
qIf the service isn’t active, start it manually:
sudo systemctl start postgresqlThen verify its status again:
sudo systemctl status postgresqlTo make sure PostgreSQL starts automatically whenever your VPS reboots, enable the service:
sudo systemctl enable postgresqlYou should see a confirmation message indicating that the service has been enabled.
This is an important step because your Django application won’t be able to connect to the database if PostgreSQL isn’t running after a server restart.
One of the easiest ways to verify the server is ready is to switch to the default PostgreSQL administrator account.
Run:
sudo -i -u postgresYour prompt will change to something similar to:
postgres@your-server:~$Now open the PostgreSQL interactive shell:
psqlIf everything is working correctly, you’ll see a prompt like:
postgres=#This means the PostgreSQL server is running and accepting local connections.
To leave the PostgreSQL shell, type:
\qThen return to your normal user account:
exitFor an extra confirmation, you can check whether PostgreSQL is listening on its default port (5432).
Run:
sudo ss -tulpn | grep 5432You should see output indicating that PostgreSQL is listening on port 5432.
For a typical Django deployment where both Django and PostgreSQL are running on the same VPS, the database listens on the local interface, which is the recommended and most secure configuration.
If PostgreSQL doesn’t install or start correctly, here are a few things to check:
sudo systemctl restart postgresqlWith PostgreSQL installed and running, the next step is to create a dedicated database and a separate database user for your Django application.
Although PostgreSQL includes a default postgres superuser, you should avoid using it directly in your Django project. The postgres account has unrestricted administrative privileges, which makes it unsuitable for everyday application access.
A better approach is to create:
This follows the principle of least privilege, improving both security and maintainability.
First, log in as the PostgreSQL system user:
sudo -i -u postgresYour terminal prompt should change to something similar to:
postgres@your-server:~$Now open the PostgreSQL interactive shell:
psqlIf successful, you’ll see:
postgres=#You’re now ready to create your database.
Create a database that will store all of your Django application’s data.
Replace myprojectdb with your preferred database name.
CREATE DATABASE myprojectdb;If everything works correctly, PostgreSQL returns:
CREATE DATABASEChoose a database name that’s easy to recognize, especially if your VPS hosts multiple applications.
Examples:
Using descriptive names makes server management much easier later.
Next, create a new PostgreSQL user that Django will use when connecting to the database.
Example:
CREATE USER django_user WITH PASSWORD 'YourStrongPasswordHere';Example output:
CREATE ROLEReplace:
A strong password should:
Example:
T7@kL92!Pg#xQ8vRNever use simple passwords like:
Weak passwords make your database much easier to compromise.
Now allow your new user to access the database.
Run:
GRANT ALL PRIVILEGES ON DATABASE myprojectdb TO django_user;Output:
GRANTThis allows your Django application to connect to and work with the database.
On newer PostgreSQL versions, it’s also a good idea to grant permissions on the default public schema. This helps avoid permission-related errors when Django creates tables during migrations.
First, connect to your new database:
\c myprojectdbThen run:
GRANT ALL ON SCHEMA public TO django_user;Example output:
GRANTThis gives your application the necessary rights to create and manage database objects within the schema.
You can list all databases by running:
\lYou should see something similar to:‘
myprojectdb
postgres
template0
template1
This confirms your new database exists.
To list PostgreSQL users (roles), run:
\duExample output:
Role name      | Attributes
---------------+--------------------
postgres       | Superuser
django_user    |
This confirms that your application user has been created successfully.
Before configuring Django, it’s a good idea to verify that the new credentials actually work.
Exit the PostgreSQL shell:
\qReturn to your normal shell if needed:
exitNow try connecting with the new user:
psql -U django_user -d myprojectdb -h localhostPostgreSQL will prompt you for the password.
If the login succeeds, you’ll enter the PostgreSQL shell:
myprojectdb=>This confirms:
Exit the shell when you’re done:
\qYou’ll need the following information in the next step when configuring Django:
| Setting | Example |
| Database Name | myprojectdb |
| Database User | django_user |
| Database Password | YourStrongPasswordHere |
| Host | localhost |
| Port | 5432 |
Rather than hardcoding these values into your Django project, you’ll learn later how to store them securely using environment variables.
When creating a PostgreSQL database for Django, these are some of the most common issues developers run into:
Taking a few extra minutes to verify each step now can save a lot of troubleshooting later.
At this point, your PostgreSQL database is ready. However, Django still doesn’t know how to communicate with it.
To bridge the gap between your Django application and the PostgreSQL server, you’ll need to install a PostgreSQL database driver for Python. This driver allows Django’s ORM (Object-Relational Mapper) to send queries, retrieve data, and perform database operations without requiring you to write raw SQL for everyday tasks.
Without this driver, Django won’t be able to establish a connection to your PostgreSQL database, even if your database settings are configured correctly.
If your Django project uses a virtual environment, which is the recommended approach, activate it before installing any Python packages.
Navigate to your project directory if you aren’t already there:
cd /path/to/your/django-projectNow activate your virtual environment:
source venv/bin/activateDepending on your project, the virtual environment folder may have a different name, such as:
After activation, your terminal prompt should look similar to:
(venv) ubuntu@server:~/myproject$If you’re not using a virtual environment, you can still continue, but using one is strongly recommended because it keeps your project’s dependencies isolated from the rest of the system.
Before installing new packages, it’s a good idea to update pip to the latest version.
Run:
python -m pip install --upgrade pipOr, if your server uses Python 3 explicitly:
python3 -m pip install --upgrade pipKeeping pip updated helps avoid installation issues with newer Python packages.
For most Django projects, install the PostgreSQL driver using:
pip install psycopg[binary]This installs the modern psycopg (version 3) driver along with its binary dependencies, making installation easier on most Linux servers.
If you’re working with an older Django project that specifically depends on psycopg2, you can install:
pip install psycopg2-binaryWhich one should you choose?
Once the installation finishes, check that the package was installed successfully.
For the modern driver:
pip show psycopgExample output:
Name: psycopg
Version: 3.x.x
Or, if you installed psycopg2-binary:
pip show psycopg2-binaryYou can also list installed packages:
pip listLook for either:
If it’s listed, the installation was successful.
A quick import test helps confirm that Python can access the installed package.
For psycopg (v3):
python -c "import psycopg; print('PostgreSQL driver installed successfully')"Expected output:
PostgreSQL driver installed successfullyIf you’re using psycopg2:
python -c "import psycopg2; print('PostgreSQL driver installed successfully')"Receiving the success message means the driver is installed correctly and ready for Django to use.
If your project uses a requirements.txt file, don’t forget to update it so anyone deploying the project later installs the same dependencies.
Run:
pip freeze > requirements.txtOr, if you prefer to append only the new package manually, add the appropriate line:
For psycopg:
psycopg[binary]Or for psycopg2:
psycopg2-binaryKeeping your dependencies documented makes deployments more consistent across development, staging, and production environments.
If the driver doesn’t install successfully, here are a few things to check:
Most installation issues are caused by using the wrong Python environment rather than problems with PostgreSQL itself.
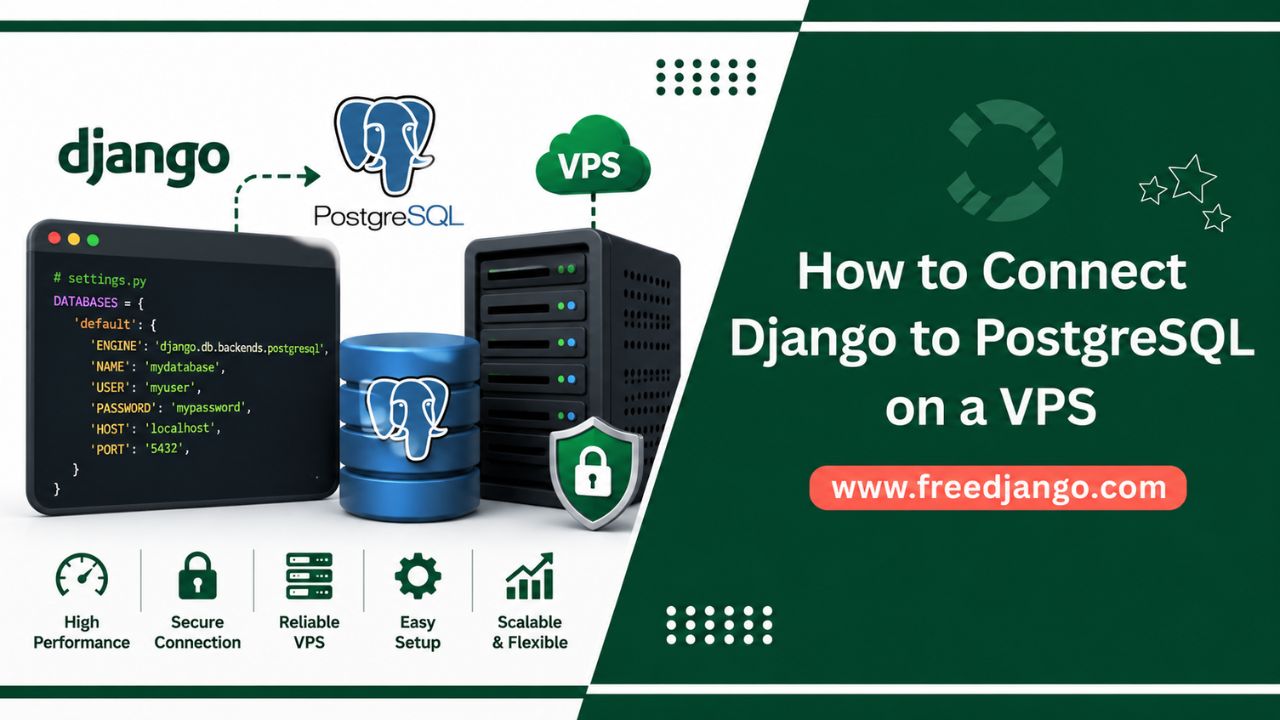
Now comes the most important part of the setup, configuring Django to use your PostgreSQL database instead of the default SQLite database.
When you create a new Django project, the settings.py file is configured to use SQLite automatically. That’s great for local development, but for a production VPS, you’ll want Django to connect to the PostgreSQL database you created earlier.
In this step, you’ll replace the default database configuration with your PostgreSQL credentials and verify that everything is configured correctly.
Every Django project contains a settings.py file where the project’s configuration is stored.
A typical project structure looks like this:
myproject/
├── manage.py
├── requirements.txt
├── venv/
└── myproject/
   ├── __init__.py
   ├── settings.py
   ├── urls.py
   ├── asgi.py
   └── wsgi.py
Navigate to your project directory:
cd /path/to/your/projectThen open the settings.py file using your preferred text editor.
For example, with Nano:
nano myproject/settings.pyOr with Vim:
vim myproject/settings.pyReplace myproject with your actual Django project folder name.
Inside settings.py, you’ll find a section similar to this:
DATABASES = {
   'default': {
       'ENGINE': 'django.db.backends.sqlite3',
       'NAME': BASE_DIR / 'db.sqlite3',
   }
}
This tells Django to use SQLite.
Since you’re moving to PostgreSQL, this configuration needs to be replaced.
Replace the SQLite configuration with the following:
DATABASES = {
   "default": {
       "ENGINE": "django.db.backends.postgresql",
       "NAME": "myprojectdb",
       "USER": "django_user",
       "PASSWORD": "YourStrongPasswordHere",
       "HOST": "localhost",
       "PORT": "5432",
   }
}
Replace the placeholder values with your own:
| Setting | Description |
| NAME | Your PostgreSQL database name |
| USER | PostgreSQL username created earlier |
| PASSWORD | Password for that PostgreSQL user |
| HOST | Usually localhost when PostgreSQL runs on the same VPS |
| PORT | PostgreSQL’s default port (5432) |
If your Django application and PostgreSQL server are running on the same VPS, keeping the host as localhost is the most common and secure configuration.
Before saving the file, it’s useful to understand what each option means.
This tells Django which database backend to use.
For PostgreSQL:
"ENGINE": "django.db.backends.postgresql"If this value is incorrect, Django won’t know how to communicate with PostgreSQL.
This is the database that Django will use.
Example:
"NAME": "myprojectdb"It must match the database you created in PostgreSQL.
The username Django uses when connecting to PostgreSQL.
Example:
"USER": "django_user"This should be the dedicated application user, not the postgres superuser.
This is the password associated with your PostgreSQL user.
Example:
"PASSWORD": "YourStrongPasswordHere"The password must exactly match the one you assigned when creating the PostgreSQL user.
The database server location.
If PostgreSQL runs on the same VPS:
"HOST": "localhost"If the database is hosted on another server, replace localhost with that server’s IP address or hostname.
PostgreSQL listens on port:
"PORT": "5432"Only change this if you’ve configured PostgreSQL to use a different port.
After updating the configuration:
For Nano:
Before moving on, verify that:
Even a small typo in one of these values can prevent Django from connecting to PostgreSQL.
The configuration shown above is useful for understanding how Django connects to PostgreSQL, but hardcoding usernames and passwords directly in settings.py isn’t recommended for production environments.
If your project is stored in a Git repository or shared with other developers, sensitive credentials could accidentally be exposed.
A more secure approach is to load these values from environment variables or a .env file. This keeps secrets separate from your source code and makes deployments easier across different environments.
We’ll cover this in the next step.
If Django fails to connect after updating settings.py, check for these common issues:
Taking a moment to review these settings carefully can save a lot of debugging time.
Your Django project is now configured to connect to PostgreSQL. However, before moving any further, there’s one important improvement you should make.
In the previous step, you added the database name, username, and password directly inside settings.py. While this works, it’s not recommended for production environments.
Imagine uploading your project to GitHub or sharing it with another developer. If your database credentials are hardcoded into the project, anyone with access to the code could see them. This creates an unnecessary security risk.
A much safer approach is to store sensitive information in environment variables or a .env file. Your application reads these values at runtime, keeping passwords and other secrets separate from your source code.
Using environment variables provides several advantages:
In short, your code remains the same across environments, while only the configuration changes.
One of the simplest ways to manage environment variables in Django is by using the python-decouple package.
If it isn’t already installed, activate your virtual environment and run:
pip install python-decoupleOnce the installation is complete, verify it:
pip show python-decoupleYou should see information about the installed package.
Inside your Django project directory (where manage.py is located), create a file named:
.envOpen the file and add your database credentials.
Example:
DB_NAME=myprojectdb
DB_USER=django_user
DB_PASSWORD=YourStrongPasswordHere
DB_HOST=localhost
DB_PORT=5432
Replace these example values with your own PostgreSQL database information.
Important: Do not wrap the values in quotes unless they’re actually part of the value.
Next, open your settings.py file and import the config function.
Near the top of the file, add:
from decouple import configNow replace your hardcoded database configuration with this:
DATABASES = {
   "default": {
       "ENGINE": "django.db.backends.postgresql"
       "NAME": config("DB_NAME"),
       "USER": config("DB_USER"),
       "PASSWORD": config("DB_PASSWORD"),
       "HOST": config("DB_HOST", default="localhost"),
       "PORT": config("DB_PORT", default="5432"),
   }
}
Now Django loads the database credentials from the .env file instead of storing them directly in the project.
This makes your configuration cleaner, safer, and much easier to manage.
Your .env file contains sensitive information and should never be committed to a Git repository.
If your project uses Git, open (or create) a .gitignore file and add:
.envThis tells Git to ignore the file, helping prevent accidental exposure of passwords and other secrets.
If you’re working on a team, share the required environment variable names separately instead of sharing the actual .env file.
A quick way to confirm everything is working is to open the Django shell:
python manage.py shellThen try importing one of the variables:
from decouple import config
print(config("DB_NAME"))
If Django prints your database name without any errors, it means the .env file is being read correctly.
Exit the shell by typing:
exit()If Django can’t read the environment variables, check the following:
Most configuration problems come down to a typo in the variable names or placing the .env file in the wrong location.
As your Django project grows, following a few simple security practices can help protect your database and application:
These small habits significantly reduce the risk of accidentally exposing sensitive information.
With PostgreSQL installed, your database created, the PostgreSQL driver configured, and your settings.py updated, it’s time to let Django create its database tables.
This is done using migrations.
If you’re new to Django, think of migrations as instructions that tell Django how your database should look. Instead of manually creating tables, Django generates and applies them automatically based on your project’s models.
When migrations run successfully, it’s one of the clearest signs that Django is communicating with your PostgreSQL database correctly.
Before running any Django management commands, activate your virtual environment.
For example:
source venv/bin/activate
Your prompt should now include the virtual environment name:
(venv) ubuntu@server:~/myproject$
If you’re not using a virtual environment, you can skip this step.
Move to the directory where the manage.py file is located.
Example:
cd /path/to/your/projectTo verify you’re in the correct location, run:
lsYou should see something similar to:
manage.py
requirements.txt
myproject/
venv/
If manage.py isn’t listed, you’re in the wrong directory.
Before applying migrations, it’s good practice to let Django check whether any model changes need migration files.
Run:
python manage.py makemigrationsIf there are no new model changes, Django may display:
No changes detectedIf you’ve recently created or modified models, Django will generate new migration files automatically.
Now apply all pending migrations:
python manage.py migrateDjango will begin creating the required tables inside your PostgreSQL database.
A successful migration usually looks similar to this:
Applying contenttypes.0001_initial... OK
Applying auth.0001_initial... OK
Applying admin.0001_initial... OK
Applying sessions.0001_initial... OK
Depending on your installed applications, you may see additional migrations as well.
Each line ending with OK indicates that Django successfully created or updated the corresponding database tables.
After the migrations complete, you can verify that the tables exist in PostgreSQL.
Connect to your database:
psql -U django_user -d myprojectdb -h localhostEnter your database password when prompted.
Once connected, list all tables:
\dtYou should see tables similar to:
auth_user
auth_group
django_admin_log
django_content_type
django_migrations
django_session
If these tables are present, Django has successfully created its database schema inside PostgreSQL.
Exit PostgreSQL:
\qIf you previously used SQLite, you may want to confirm that Django is now connected to PostgreSQL.
Open the Django shell:
python manage.py shellRun:
from django.db import connection
print(connection.vendor)
Expected output:
postgresqlIf you see postgresql, Django is connected to your PostgreSQL database.
Exit the shell:
exit()If this is a fresh deployment, you’ll probably want access to Django’s admin panel.
Create an administrator account:
python manage.py createsuperuserDjango will ask for:
Example:
Username: admin
Email address: admin@example.com
Password:
Password (again):
After completion, you’ll see:
Superuser created successfully.
You’ll use these credentials to log in to the Django admin dashboard later.
When you run the migrate command, Django automatically creates the database tables required by your project and installed applications.
Some of the tables created include:
As your project grows, future migrations will update the database structure whenever you add or modify models.
This migration system is one of Django’s biggest strengths because it keeps your database synchronized with your application code.
If migrations don’t complete successfully, here are a few things to check:
| Problem | Possible Cause | Solution |
| password authentication failed | Incorrect database password | Verify your PostgreSQL username and password in settings.py or .env. |
| database does not exist | Wrong database name | Make sure the database was created and the name matches exactly. |
| connection refused | PostgreSQL service isn’t running | Start PostgreSQL using sudo systemctl start postgresql. |
| ModuleNotFoundError: psycopg | PostgreSQL driver missing | Install psycopg (or psycopg2-binary) in your virtual environment. |
| permission denied | Database user lacks privileges | Grant the required permissions to the PostgreSQL user. |
Most migration failures are caused by configuration errors rather than problems with Django itself.
At this stage, all the major configuration work is complete. PostgreSQL is installed, Django is configured to use it, and the required database tables have been created successfully.
The final step is to verify that everything works as expected.
Testing the connection ensures that your Django application can communicate with PostgreSQL without any issues. It’s much better to catch configuration problems now than after your application goes live.
Let’s perform a few simple checks.
The easiest way to test the database connection is to start your Django project.
From your project directory, run:
python manage.py runserverIf everything is configured correctly, you’ll see output similar to:
Watching for file changes with StatReloader
Starting development server at http://127.0.0.1:8000/
Quit the server with CONTROL-C.
This indicates that Django started successfully and was able to connect to PostgreSQL during startup.
Open your browser and visit:
http://127.0.0.1:8000/If you’re running Django remotely on a VPS, access it using your server’s public IP address and configured port instead.
If your homepage loads without any database-related errors, your PostgreSQL connection is working correctly.
If you created a superuser in the previous step, testing the admin dashboard is another excellent way to confirm the database connection.
Visit:
/admin/Example:
http://your-server-ip/admin/Log in using the administrator account you created earlier.
If you can:
then Django is reading from and writing to your PostgreSQL database without any issues.
You can also confirm which database backend Django is currently using.
Open the Django shell:
python manage.py shellRun:
from django.db import connection
print(connection.vendor)
Expected output:
postgresqlThis confirms that Django is connected to PostgreSQL rather than SQLite.
Exit the shell:
exit()You can also verify the connection from PostgreSQL itself.
Connect to your database:
psql -U django_user -d myprojectdb -h localhostList all tables:
\dtYou should see Django’s tables, such as:
auth_user
auth_group
django_admin_log
django_content_type
django_migrations
django_session
If these tables are present, PostgreSQL is storing your Django application’s data correctly.
Exit PostgreSQL:
\qA practical way to confirm everything is working is to create a small piece of data.
For example, if your project already contains a model, open the Django shell:
python manage.py shellCreate a sample object:
from your_app.models import YourModel
YourModel.objects.create(name="Test Record")
Then retrieve it:
YourModel.objects.all()If Django successfully creates and retrieves the record, it confirms that:
Replace your_app and YourModel with the actual names from your project.
It’s also worth confirming that PostgreSQL is still running.
Execute:
sudo systemctl status postgresqlA healthy installation should display:
Active: active (running)If the service is running, Django will be able to communicate with the database whenever it’s needed.
Since production servers are restarted occasionally, for updates, maintenance, or unexpected outages, it’s important to ensure PostgreSQL starts automatically after a reboot.
Run:
systemctl is-enabled postgresqlExpected output:
enabledIf you see enabled, PostgreSQL will start automatically whenever the VPS boots.
Your Django and PostgreSQL setup is ready if you can confirm the following:
If every item above checks out, your Django application is successfully connected to PostgreSQL.
Connecting Django to PostgreSQL is an important milestone, but it’s only one part of preparing a production-ready deployment.
Once you’ve confirmed that everything is working, consider these next steps to improve your application’s performance, security, and reliability:
With these improvements in place, your Django application will be better prepared to handle real users in a production environment.
The next sections of the article should be:
These sections will complete the guide by helping readers troubleshoot issues, secure their deployment, optimize PostgreSQL performance, and quickly revisit important commands whenever needed.
Even if you follow every step carefully, it’s normal to run into a few issues while connecting Django to PostgreSQL on a VPS. Most problems are caused by small configuration mistakes, such as incorrect credentials, missing packages, or permission issues.
The good news is that these errors are usually straightforward to fix once you know what to look for.
Below are some of the most common problems developers encounter, along with their likely causes and solutions.
| Error or Issue | Possible Cause | How to Fix It |
| FATAL: password authentication failed | Incorrect PostgreSQL username or password | Double-check the values in your .env file or settings.py. Make sure the password matches the one assigned to the PostgreSQL user. |
| database “myprojectdb” does not exist | Database name is incorrect or the database hasn’t been created | Log in to PostgreSQL and run \l to verify the database exists. Update your Django configuration if the name doesn’t match. |
| connection refused | PostgreSQL service is stopped or not listening | Check the service status with sudo systemctl status postgresql. Start it using sudo systemctl start postgresql if necessary. |
| ModuleNotFoundError: No module named ‘psycopg’ | PostgreSQL driver isn’t installed in the active virtual environment | Activate your virtual environment and install the required driver using pip install psycopg[binary] or pip install psycopg2-binary. |
| permission denied for schema public | The database user doesn’t have permission to create tables | Connect as the PostgreSQL administrator and grant the required privileges on the public schema. |
| could not connect to server | Incorrect host or port configuration | Verify that HOST is set to localhost (or the correct database server) and PORT is 5432 unless you’ve changed it. |
| Migrations fail unexpectedly | PostgreSQL credentials are incorrect or the database service isn’t available | Review your database configuration and confirm PostgreSQL is running before executing python manage.py migrate. |
| Django still uses SQLite | settings.py wasn’t updated correctly or an old configuration is being loaded | Verify that DATABASES points to PostgreSQL and restart your application after making changes. |
Most connection issues can be resolved by carefully reviewing your database credentials, confirming PostgreSQL is running, and ensuring the required Python packages are installed in the correct environment.
Getting Django connected to PostgreSQL is only the first step. If your application is running on a public VPS, taking a few extra security measures can help protect your database from unauthorized access and reduce the risk of future problems.
Here are some recommended practices to follow.
Avoid connecting Django with the default postgres superuser.
Instead, create a separate PostgreSQL user specifically for your application and grant only the permissions it needs. This limits the impact of accidental changes or compromised credentials.
Never leave database passwords directly inside settings.py.
Use environment variables or a .env file so sensitive information remains separate from your application code.
If you’re using Git, always add your .env file to .gitignore to prevent it from being committed accidentally.
Your PostgreSQL password should be:
Avoid reusing passwords across different services.
Security updates often include important bug fixes and vulnerability patches.
Regularly update your VPS packages by running:
sudo apt update
sudo apt upgrade
Keeping PostgreSQL and your operating system up to date helps reduce potential security risks.
If Django and PostgreSQL are running on the same VPS, PostgreSQL usually doesn’t need to accept remote connections.
Using localhost for your database host keeps the database accessible only from the local server, reducing unnecessary exposure.
If remote access is required, allow connections only from trusted IP addresses and secure them with appropriate firewall rules.
No matter how secure your server is, backups are essential.
Create scheduled backups so you can quickly restore your application if something goes wrong due to hardware failure, accidental deletion, or software issues.
Testing your backup and restore process periodically is just as important as creating the backups themselves.
Keep an eye on your PostgreSQL logs and server resources.
Monitoring helps you identify unusual activity, performance bottlenecks, or repeated login failures before they become bigger problems.
Once your Django application starts receiving real traffic, a few performance optimizations can help PostgreSQL handle requests more efficiently.
Indexes speed up database queries, especially when searching, filtering, or sorting large amounts of data.
Only create indexes where they’re actually needed, as unnecessary indexes can slow down write operations.
Whenever possible:
Efficient queries reduce database load and improve response times.
Opening a new database connection for every request adds unnecessary overhead.
For larger applications, consider using a connection pooler such as PgBouncer to manage PostgreSQL connections more efficiently.
As your application grows, some database queries may become slower.
Enable PostgreSQL logging for slow queries and review them periodically to identify opportunities for optimization.
PostgreSQL includes maintenance commands that help reclaim storage and update internal statistics.
Routine maintenance improves long-term database performance, especially for applications with frequent inserts, updates, or deletions.
Running PostgreSQL on SSD or NVMe storage significantly improves read and write performance compared to traditional hard drives.
Many VPS providers now include NVMe storage by default, making it an excellent choice for database workloads.
If your application begins receiving more traffic, monitor CPU, memory, and disk usage.
Scaling your VPS resources when needed is often simpler than troubleshooting performance issues caused by resource limitations.
Here’s a quick reference for the main commands used throughout this guide.
| Task | Command |
| Connect to VPS | ssh username@server_ip |
| Update packages | sudo apt update |
| Install PostgreSQL | sudo apt install postgresql postgresql-contrib -y |
| Check PostgreSQL version | psql –version |
| Check PostgreSQL status | sudo systemctl status postgresql |
| Start PostgreSQL | sudo systemctl start postgresql |
| Enable PostgreSQL on boot | sudo systemctl enable postgresql |
| Switch to postgres user | sudo -i -u postgres |
| Open PostgreSQL shell | psql |
| Create database | CREATE DATABASE myprojectdb; |
| Create database user | CREATE USER django_user WITH PASSWORD ‘password’; |
| Grant database privileges | GRANT ALL PRIVILEGES ON DATABASE myprojectdb TO django_user; |
| Install PostgreSQL driver | pip install psycopg[binary] |
| Create migrations | python manage.py makemigrations |
| Apply migrations | python manage.py migrate |
| Create Django superuser | python manage.py createsuperuser |
| Start Django server | python manage.py runserver |
Having these commands in one place makes it easy to revisit important steps without scrolling through the entire tutorial.
Connecting Django to PostgreSQL on a VPS is one of the first steps toward preparing your application for a production environment. While SQLite works well during development, PostgreSQL provides the performance, reliability, and scalability needed for real world deployments.
In this guide, you installed PostgreSQL, created a dedicated database and user, configured Django to use PostgreSQL, secured your database credentials with environment variables, ran migrations, and verified that everything was working correctly. By following these steps, your Django application is now using a production ready database that’s better equipped to handle growth and concurrent users.
As you continue deploying your application, consider setting up Gunicorn, Nginx, HTTPS with Let’s Encrypt, automated backups, and regular monitoring. These additions will help improve your server’s security, performance, and long term reliability, giving you a solid foundation for hosting Django applications on a VPS.
Yes. Django has built in support for PostgreSQL through its database backend. After installing a compatible PostgreSQL driver and updating the DATABASES configuration in settings.py, Django can use PostgreSQL for all database operations.
No. SQLite is suitable for learning, testing, and small projects. However, PostgreSQL is generally the preferred choice for production deployments because it offers better performance, reliability, and support for concurrent users.
In most cases, yes. PostgreSQL is designed for production environments and provides advanced security, transaction support, scalability, and efficient handling of multiple simultaneous connections.
For new projects, the modern psycopg package is a good choice. Existing projects may continue using psycopg2-binary if it’s already part of their deployment. Always use the driver that’s compatible with your Django version and project requirements.
You can run: python manage.py shell
Then execute: from django.db import connection
print(connection.vendor)
If the output is postgresql, Django is connected to your PostgreSQL database.
Yes. Many developers begin with SQLite during development and later migrate to PostgreSQL for production. The process typically involves creating a PostgreSQL database, updating Django’s database configuration, applying migrations, and transferring any existing data if required.
Yes. PostgreSQL is an opensource relational database management system and can be installed on most Linux VPS servers without licensing fees.
For small to medium sized projects, running Django and PostgreSQL on the same VPS is a common and practical setup. As your application grows, you may choose to move PostgreSQL to a dedicated database server for improved scalability and resource isolation.